I've been featued in the Bitter Sweet Zine Winter issue!!!
Showing posts with label cuttlebug. Show all posts

Monday, January 16, 2012

Love a little

Hello there!!!


Todays fun post is a super cute little Valentines Day necklace I've created out of PMC. PMC is precious metal clay that once it has been fired is .999 fine silver! Super fun stuff to work with! I got out one of my fun cuttlebug embosing folders and pressed it into the clay when it was still wet. I then placed it on my handy andy candle warmer to dry and about minutes laer it was ready for sanding and firing..then comes all the buffing scrubbing and adding patina follwed by mor buffing anf scrubbing! When its all said and done...it looks like this!


On the back of this little cutie I hand stamped the word LOVE...there is enough space that I can stamp and I and a you or U to make it say I LOVE U!


This little cutie sells for $29 and gets delivered to you for FREE with pretty tissue paper and a little box ready for gift giving!


You can check it out here in my ETSY SHOP


Thanks for stopping by!

Come back tomorrow for Marks Finest Papers Release Blog hop!!


Blessings to you all!


Silvia

Saturday, January 9, 2010

Pretty Little Box

I love making boxes...they pretty much rock! And they are useful to boot! I made this little box for a friend as a thanks for having us over...it was filled with chocolate!

But before I show you the box, I'll have to show you the card...cuz it's pretty cute too. Pretty simple but it get's the point accross!


I used my cuttlebig Olivia alphabet to cut out the "thanks" and then I used my only orange craft inks to color it... I love the pop of color it adds! And since we were going over there for dinner I thought the little table and chairs from the {Garden Gate} stamp set was a great touch!


And here is the little box...isn't it sooooo cute! I got the template from Mels Blog, and for the life of me I can't find the link now...I need to get better at saving it when I find it...poooo!


I super LOVE how the handles came out and I followed Lauren's Step by step instructions she has on her video but smaller...my clips and box were smaller than hers and I think it looks super cute, big or small!


Don't you think it's super cute? Even my friends son mentioned how awesome it was! hehehe Now that's the seal of accomplishment!


And here is the whole set...I even made a beaded pen...hadn't made one in ages LOVE them! I need me some more red tape! Good thing I have plenty of micro beads!

Supplies:

Stamps: {Garden Gate} by Little Paper Shop

Ink: Stazon black, only orange craft ink

Paper: Kiwi kiss, chocolate chip, SU! retired designer paper

Accessorie: linnen thread, basic grey buttons, word window punch, binder clips, brads, ribbon, nestabilities, chipboard, big shot, olivia alphabet by cuttlebug, 1/8 inch circle punch, micro beads, red tape, scallop edge punch

Thank you sooo much for stopping by! I do hope you'll come back soon!

Have a blessed day!

Silvia

Sunday, November 29, 2009

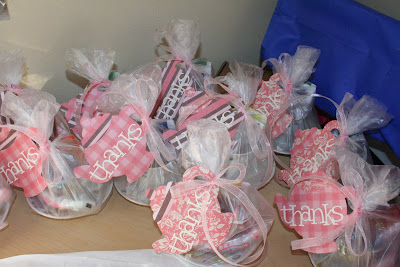
Emelia's Tea Party Favors


My sweet baby girl had a tea party this weekend...her 4th birthday was yesterday! And she helped me make the invitations (Can be seen here) and she also helped me make the party favors...love that girl...we had sooo much fun!
Doesn't she just look gorgeous! I might be a little partial, but I think she's stunning! LOL Love how she'ss pose for me!


Yes she's in her underoos! I couldn't get her to get dressed that morning! Sheesh! But isn't she handling that big shot like a master!!! When we were working she kept telling me her muscles were getting bigger...and when we were done she started flexing and kissing her arms! HA!!!


Each of the favors had a tea cup and saucer, tea bag of assorted decaf tea, candy necklace, a little ring and earing stickers. The boys had chocolate coins and boyish stickers in theirs. I think the favors turned out cute and I already had a boy tell me he used his tea cup! YEAHHH!!!


Supplies:


Stamps: None


Ink: none


Paper: Garden party by DCWV


Accessories: Big shot, tea pot die, ribbon, Olivia Cuttlebug alphabet


Thank you soooo much for stopping by! Happy Stampin!


Hugs to all!


Silvia

Saturday, October 17, 2009

Your Next Taylored Sketch Inspiration

Hello stamping friends...sorry for my absence this week...I was a bit busy with my mom and sister sisiting me on the Island...and they only stayed for one short week so we had to take advantage of every minute!


But I am back today and I have a card that meets several fun challenges in blog land. I used the sketch from last weeks Taylored Expressions SC86 post and I used the IC challenge 202 for todays challenge as well as the Pink and Yellow challenge from Your Next Stamp challenge blog...lot's of fun and a super cute card!


This stamp set set is called {Birthday Princess} and it's by Your Next Stamp...they have some super fun stamps and you should go check them out...they just lowered their shipping costs too, so now they are even more of a bargain! I did some paper piecing on these gorgeous girls...I love paper piecing...it turns out so super cute and it's soooo easy! I then colored the rest of the girls, the hair and skin. Added some glitter and gems and called it a day...I did use a cuttlebug alphabed {Olivia} for the Thanks...I haven't used that think in a while...I really like how it turned out! Although, I think that I really need more ribbon...can a girl have too much ribbon, buttons, pretty papers, stamps, accessories, hmmm what else does a girl need! LOL


This is the tile that I was inspired by over at Xenia Taler . I was inspired by the pretty colors and the dots are just awesome! I used gems instead of gems and I think it looks super cute! The saffron on the tile is just gorgeous!


Supplies:
Stamps: Birthday Princess by Your Next Stamp
Ink: Stazon black
Paper: retired designer paper, so saffron, regal rose
Accessories: gems, cuttlebug Olivia font, water color pencils, glitter

Thank you sooo much for stopping by! I hope you like my card today! Happy Stampin!!!


Hugs,


Silvia

Saturday, September 26, 2009

Whimsey S.O.S Sketch distressed!

Hello all,


I'm here with a super cute , super fun, challenge loaded card! This one is for 4 different challenges...all fun in their own right! For a third time this week is Whimsey Doodles challenge to use buttons...I'm running out of buttons people! Might have to snag more from the kids! LOL


The sketch is from Beate's awesome blog Fresh and Fun and it's her 99th sketch! I love Beate's sketches and this one is no exception...it's a fun sized card measureing 2.75 x 5.5 I love longish type cards!


The S.O.S. comes from yesterdays Limited Supplies Challenge on SCS...
S- sanding
O- out of the box (or circle in this case) technique
S- snow, swirls, snowman


And last but certainly NOT least is the challenge over at Taylored expressions to use distressing on your project...I choose to emboss the top panel with the swirl cuttlebug folder and then distress it by sanding it for a more snowy feel! So my project doesn't have a kitchen theme persay, but the swirl distressed paper reminds me of cinammon....my FAVORITE spice in my kitchen...I hope this works!


Here is my card! I am in LOVE with this digi image from Little Paper Shop her name is {Katie Igloo}
and she is absolutely FAB!!! So many possibilities with her! I love her hat! I decided to use some embroidery floss to add to a brad so it looked like a pom pom on top of her head and then I also added some little bitty pieces at the end of her scarf for a little more dimention. The scalloped punch is a marvy and to cut the circle I used the coluzzle cutting system and left katie uncut and then trimmed around her with my scissors! Colored her with water color pencils and then a blender pen to smooth it all out!


I think the buttons add a great touch and I also used them to cover up a small tear in my paper...hhahaa I lvoe using embelishments as coverups!

I opted to leave off the sentiment because the pretty shinny paper with all the words was sentiment enough...What do you thinkg?


And here is a little close up of the hat and scarft! Isn't it fab! on a side note, I used a cuttlebug embossing folder but was too lazy to get the maching out because I have a bunch of things on top of it and so I used my rolling pin praying that it would work! And it did!!! I was soooo excited!
Anywho, thank you soooo much for stopping by! Have a blessed weekend!
Happy Stampin'
Silvia

Tuesday, August 25, 2009

Mojo Craft Birthday!

So todays card is for 3 challenges...I am leaving for a weeks vacation tomorrow and wanted to get some play time before we leave! (Not to worry though,,,I will have scheduled posts for you while we're gone!) then when I get back I'll have to share some pics with you! We are touring the east end of the Island (Crete...where we are currently blessed to be living!)
Anywho, the three challenges are todays color challenge (CC233), The There She goes one year birthday bash celebration (TSG17), There she goes is celebrating their one year anniversary...lots of challenges and PRIZES!!! And last but certainly NOT Mojo Monday challenge 101. All the links are attached...come and play along!

For this card I am using a set from There She goes called {Cupcake Mix and Match} It's a super cute set and extremely versatile!!!!


I used a dab of crystal effect on top of the cherrie just to make it pop a little...love how it looks! I'm practicing my coloring (this is only my second thing I've colored! So don't be too harsh!) ...just got a set of copics the other day and I think I'm in love...now I just need more for shading and stuff!


Supplies:
Stamps: {Cup Cake Mix and Match} by There She goes
Paper: Kraft, chocolate chip, whisper white, real red
Ink: Craft chocolate chip
Accessories: satin ribbon, stapler, Spellbinders lables die #3, big shot, word window punch, crystal effects, numbers embossing folder, big shot, copic brights from Ucut@home.com


Anywho I hope you like it! Thanks for stopping by!


Happy Stampin'


Silvia


"In everything, therefore, treat people the way you want to be treated for that is the law and the profits." Matthew 7:12

Friday, August 7, 2009

Another LSC challenge card...

I had an impromtu birthday party to attend this evening and I decided to make hima super quick card and fill with cash...I wanted simple and I wanted quick...so I used a basic layout that I hadlready used this week, but instead of embossing...I debossed...I think it turned out super cute and I know the boys Momma loved it! LOL

Here is a closeup of the card for you...I love how the debossing looks! (simply flip your CB folder upside down and then run through the machine as normal) I added a a silver brad to add some accent and since the little cupcae was so small I added a little white square to break up the space between the cupcake wrapper and DSP in the background.

I don't know if you can see it, but the upcake has chuncky glitter on top and is also popped up on a dimentional...too cute...the glitter was my daughters choice...she's 3.5! LOL


And here is a full view of the card...cute huh! LOVE IT!!! Alwahough it's had to take a good pi of this card...I love making them...this cuttlebug folder needs to look out! Lots of use coming it's way!!!


Supplies:
Stamps: Sugar By http://www.littlepapershop.com/ sentiment from Stampin' Up! retired stamp
Ink: Stazon blacl
Paper: Shimmery white, SU! DSP
Accessories: CB folder, blender pen, chuncky glitter, big shot


Thank you so much for stopping by! Pleas eb sure to stop by SCS and see today's challenge... enjoy it!

Hugs and happy stampin'

Silvia

Sunday, January 4, 2009

Journals


I made my nieces some journals for Christmas and I think they turned out pretty cute! I used some chipboard and cut it to size...they both measure 5x6. For the inside pages I simply used some copy paper from our printer and cut it to size...I paired it with a box on jumbo crayons and I think it made a super cute gift! They loved it and wanted to get drawing right away!
This one if for Olivia...hahaha and I used Groovey Guava designer paper on it (I don'[t think she's going to mind that it's last years In-Colors! LOL) and I used chocolate chip, very vanilla and my last tiny bit of Grovey guava cardstock. I used my scallop boarder punch and the Bind-it-all to hold it all together, a coat of modge podge and it was done...super cute, super fun anf she loved it! What more can you ask for?
This next one is for...you guessed it...Courtney! For her book I used a retired DSPaper that for the life of me I can not remember the name of! But I also used chocolate chip on hers...some modge podge and the BIA and that was about it.

Supplies:
Stamps: None
Ink: none
Paper: Chocolate Chip, Groovey Guava, Very Vanilla, Groovey Guava DS paper and an unknown DS paper
Accessories: scallop boarder punch, Bind it all, Cuttlebug Olivia Alphabet, Big Shot

Thanks for stopping by! I hope you try making a journal sometime... they are super fun and super simple.

Happy Stampin'
May God bless you todat and always,

Silvia

Friday, January 2, 2009

I did it!!! I stamped something!!!

I have been working on these cute little tins for my nieces and thought I would show them to you today! I have been super busy lately...I'm sure most of you have with the holidays and extra kids at home and all, but I have also been packing...we're movig to Greece in a couple of moths and I am super excited...the mover come on Monday and then I move in with my paresn't...should be interesting...until we move in March! But I did get something done that I want to show you! I will have even more tomorrow...crazy I know...me showing you something 2 days in a row after being MIA for so long!
Anywho, you wanna see what I made? Of course you do!!!

This actually went along with todays LSC201 challenge over at www.splitcoaststampers.com to use some of your favorite things...I almost took it literally and used a stamp set by My Favorite Things and used the Isabelle Paper Doll set...I just LOVE this set... the girl is just too cute and the other images are soooo much fun to color!!! I stamped the girls with stazon black ink and colored them with water color pencils and then used a blender pen to get them nice and smooth...I then cut out the pretty papers and letters (using the Olivia Alphabet from Cuttlebug with my Big Shot machine) and added 2 coats of Modge Podge over everything to make sure it stuck super well...the girls are only almost 4 and 5...so they needed to be sturty and not too many layers or embelishments.I also used some old retire SU! papers...come of my faves that I have been hoarding...New Year New me...no more Hoarding! Here is the inside, you can see that I cut out all the little pieces after I colored them and then added Untra Thick embossing enamel to the front and back of each piece, be sure to just put one coat as the UTEE will start to crack if too many coats are added! I then attached a little piece of magnet to the back of each (I used a piece from a self adhesive buisness card I had laying around) and Voila!
Here is a look at the inside. I used more pretty paper on the left and adhered the girl and the dresser right to the paper with another coat of Modge Podge. Stamped the shoes and hangers directly on the "wall" and "floor" of the room. Thats about it! I kow my nieces will love playing with it as much as I have enjoyed making it!

Supplies:

Stamps: Fashion Statements (SU!) Isabelle Paperdoll (My Favorite Things)

Ink: Stazon Back

Paper: Whisper white, retired SU! designer papers, pretty in pink, pumpkin pie and chocolate chip

Accessories: Big Shot, cuttlebug alpha, modge podge, scallop boarder punch, water color pencils, blender pen

Thanks for stopping by!

May God bless you today and always!

Happy New Year!

Silvia

P.S. Sorry for the bad pics...I was having a time trying to take them!

Friday, June 13, 2008

Rocket Daddy???

So For todays limited supplies challenge on Splitcoaststampers we were to use a knot on our cards and limit our layers...well I achieved the knot, but not so sure I achieved the "limited layers" still a super cute card...I'm supposed to give it to one of my sons friends who is having his 5th birthday party on Saturday...but I'm not so sure...it's so darn cute!!! The sketch is by Jen del Muro and I found it in the Stamp Ten Magazine.
Supplies:
Stamps: Pun Fun
Paper: wild wasabi, cool caribean, very vanilla, designer paper from SS Kit
accessories: cuttlebug, embossing folder, star punch, ribbon, square punches, 1/4 inch circle punch, CAD, silver eyelets

As you can see I loved the sketch so much that I had to make another one...one is flipped (rocket card) and the other is not...and yes I still call my Dad "Daddy". This is his Father'sDay card...he's not so much a hunter, but he does love the outdoors...well at least he's outside when he's working...which he seems to do ALL the time!

I was going for a mono cramatic theme with this one...thats why the animals are green. Here are the supplies I used for this card

Paper: always artichoke, wild wasabi, very vanilla, SS Kit designer paper (all SU!)
stamps: wild life reserve(SU), All yeah cheer (SU)Inkadinkadoo
accessories: star punch, square punches, crop-a-dial

Thanks for stopping by!
Happy Stampin'


okay I'm off to ride bikes with the kids...see ya later!