
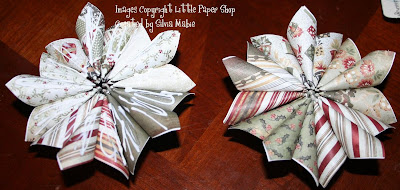
This is what a completed Kusudame Ball looks like...if you like what you see...keep scrolling down for the instructions!
 What you will need:
*60 pieces of 3x3 (7cm square) cardstock...all one pattern or various patterns, totally up to you! (If I am using SU! paper, which I liek the best for these, I will use 4 different patterns)
*liquid adhesive, I prefer Mono Multi...awesome stuff!
* Ribbon, beads, stamps and paper to accessorise.
Now, let's get started!

First you will start with the pattern you want showing on the outside facing down and with a point facing you.

You will wan tto fold the point that is facing you up to the top point so it looks like a triangle

Next you will wan to fold the right point into the center top point

do the same with the left and you now have a diamond shape again

Next, you will wan tto take the triangles and fold it so that the edges meet (center edge to outer edge)

Do this to both sides

Now you will wan to open the two flaps

amd fold down the top triangles so that they are even with the edges

Now fold the edges in so that it looks like a square again and add glue to one outter flap

Adhere together

I give it a little sqeeze int he center to make more round...instead of flat

Once you have made 5 petals you can start glueing then together to form a flower
 Start by adding glue to the outer edge
 This is what two look like glued together.
Just add two more cone shapes to this and you will have one flower

Now you have one completed flower! 11 to go and you can start piecing this bad boy together!
 And Voila! You have 12 completed flowers! YOu are half way there! Don't give up now...we start glueing them together now!!!
 Apply glue here to add your next flower! I love this part because all your hard work is finally starting to come together!
 glue the next flower in place and it looks liek this, you areon your way! Soon you will have a smashing ornament!

Apply glue here to add the third flower!

Three flowers glued together!
 This is what 4 flowers glued together will look! Gosh how I love these ornaments!

 Glue the last flower into this little crannie! You are going to love how this looks! You could even use this half as a candle holder, for maybe a tea light! Just be careful it is paper and could catch fire!
 And this is what half of the ornament looks like! Now get to work and glue the other half together!
 Once you have both halves completed, add glue to all the nooks and crannies of one half of the ornament and then add the ribbon in between.
 Here is a ribbon sampling, I used two different ribbons for this one and 2 different colors of glass beads, but any beads will work! I also added a tag where you can add a message to the recipient!
 Once you have added the ribbon in between the two I would add a bit more glue to the ribbon and then nestled the two together. They will fit together perfectly!

This is a horrible picture...a little too over exposed! Sorry about that!
 Here is one with different colors and ribbons!
 And there you have it! A tutorial on Kusudame balls! I hope you enjoy making these masmuch as I have! They are gorgeous Christmas presnts and will definately WOW people!

Now you have one completed flower! 11 to go and you can start piecing this bad boy together!
 And Voila! You have 12 completed flowers! YOu are half way there! Don't give up now...we start glueing them together now!!!
 Apply glue here to add your next flower! I love this part because all your hard work is finally starting to come together!
 glue the next flower in place and it looks liek this, you areon your way! Soon you will have a smashing ornament!
Apply glue here to add the third flower!

Three flowers glued together!
 This is what 4 flowers glued together will look! Gosh how I love these ornaments!
Now glue the 5th one into place and you are almost there!
 Glue the last flower into this little crannie! You are going to love how this looks! You could even use this half as a candle holder, for maybe a tea light! Just be careful it is paper and could catch fire!
  And this is what half of the ornament looks like! Now get to work and glue the other half together!
  Once you have both halves completed, add glue to all the nooks and crannies of one half of the ornament and then add the ribbon in between.
 Here is a ribbon sampling, I used two different ribbons for this one and 2 different colors of glass beads, but any beads will work! I also added a tag where you can add a message to the recipient!
 Once you have added the ribbon in between the two I would add a bit more glue to the ribbon and then nestled the two together. They will fit together perfectly!
This is a horrible picture...a little too over exposed! Sorry about that!
 Here is one with different colors and ribbons!
 And there you have it! A tutorial on Kusudame balls! I hope you enjoy making these masmuch as I have! They are gorgeous Christmas presnts and will definately WOW people!
Happy Stampin'
Hugs,
Silvia


.jpg)
.jpg)
.jpg)
.jpg)
.jpg)
.jpg)
.jpg)


.jpg)
.jpg)
.jpg)
.jpg)