Challenge...Limited Supply challenge 190 that is! Since my very first challenge I started with a color and for my next challenge in November I have a color I thought I would have a theme...a color limit...I love hosting! So fun!!! Anywho here are the deets!
Eyelets, ribbon and one sheet of designer paper...that's all! Yup you read it right! Of course you can use your basic cardstock...as long as the card only has those things mentioned above...and be sure to use the color blue somewhere in there too!
So there are lots of no nos, no punches, no cuttlebugs, and if you're using double sided paper...only use one side! I know rules are so hardt o follow! But please please try your hardest! You know you want to play!
Need Some Inspiration? Okay here are a couple cards!
 This fisrt one also used the plaid from yesterdays challenge...Love this paper. a very cute sketch that I rotated...found this sketch on miss JulieHRR's blog...thanks for the neat sketch Julie! This card is already in an envelope addressed and ready to go! I hope te recipient likes it! The sentiment is from a set called Topiary by the Little Paper Shop...Love this little set!
Supplies:
Stamps: Dreams Du Jour (su!), Topiary (by Little Paper Shop)
Paper: Kiwi Kiss, really Rust, Natural vanilla, Designer paper by chatterbox
Ink: Kiwi kiss, chocolate chip craft
Accessories: jumbo eyelet, crop-a-dial, kiwi kiss ribbon, sponge
 This next card I made with the intentions of using it for the sketch challenge on Wednesday but when I went to upload I saw that my skecth was off...so I used it for my challenge instead! LOL I have a ton of eyelets and need to use them up, or loose them! So I made this little beauty. I love all the eyelets...aren't they pretty! I made both of the circles using my Coluzzle cutting system and then layered them. The center heart is raised up on dimentionals...a lot more blue on this one! You can use as much or as little as you want!
Supplies:
Stamps: Heard from the heart (SU!), Sock Monkey (SU!)
Ink: Staz-on black, pink pirouette, ridding hood red, tempting turquoise
paper: Sahara Sand, tempting turquoise, shimmery white, tempting turquoise designer paper
Accessories: bold bright eyelets, crop-a-dial, sheer ribbon, sponge, coluzzle, aqua painter
Thanks for stopping by!
Happy Stampin and God Bless,
Silvia


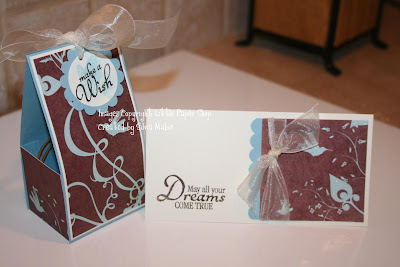 Here is a little ensamble...I wish I had made the little packaging out of the same paper I made the necklace, but unfortunately it was just a scrap! Cute non the less and I know the recipient will love it!


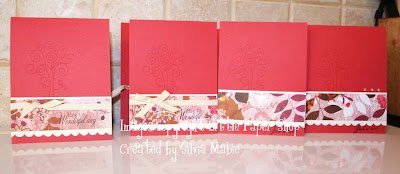
 Here is my little card portfolio...super easy to make! This little card set is going out as a Thanksgiving day gift to my sons teacher...I was slacking a little before Thanksgiving! Been a little busy! I love the tree from the


.jpg) Once the rectanle was cut I used some sticky trip and a small piece of acetate and adhered it to the inside...VOILA perfect box with a window! LOVE IT!!! I guess I sould of placed the die on the inside and then ran it through the machine, but hey I like to do things the hard way...LOL
Once the rectanle was cut I used some sticky trip and a small piece of acetate and adhered it to the inside...VOILA perfect box with a window! LOVE IT!!! I guess I sould of placed the die on the inside and then ran it through the machine, but hey I like to do things the hard way...LOL.jpg)


 Isn't this banner awesome! I went to my friend Nikki's and she was gracious enough to let me use her Cricut...Love it...hmmm I might need an expressions after all! Who knew! LOL
 I used orchid Opulance cardstock and cut the letters in 5.5 inches tall...I think? Could of been 5 inches. Anyways, Once all the letter were cut I came home and used my cuttlebug folders through my big shot...fisrt I inked the top portion of the folder also with Orchid Opluance and then ran it through. After that is was Glitter time! While all the glitter was drying I cut out 15 top note dies on shimmery white cardstock and then sponged the edges with Orchid Opulance craft ink...my fav way to sponge!
 Now for the little stamped girl...you're probably thinking...hey that's not weddingish or engagementish...well I though gosh this would be a shame to trash it after one use...so pretty and so muh work...that I thought Hey I could probably use it for other occasions...so I started thinking and decided it would be good for a birthday or a bridal shower ad even a baby shower...so I will just switch out images and call it a day! This particular image is from an
  Now, since I had all my supplie already out I went ahead and made a birthday card...never know when I might need to use it! LOL


.jpg)


.jpg)


.jpg)
.jpg)
.jpg)
.jpg)
.jpg)
.jpg)